For many years, we have heard this proverb, “A Picture is Worth a Thousand Words,” and to this day, this saying is still accurate. The imagery that a picture holds can indeed represent a thousand words. Although, the story behind each photo can be portrayed differently based on the camera settings chosen. Having a basic understanding of knowing which camera settings to choose while in manual mode can enhance and strengthen the story you are trying to captivate. Capturing a poetic representation of the subject matter we see through our lens can be expressed through simply understanding the exposure triangle: ISO, shutter speed, and aperture. With this in mind, utilizing storytelling while travelling is a beautiful opportunity to practice merging both forms of art. The images you collect share a story of your experiences. It is worth experimenting with your camera settings to truly capture the essence of your travels.
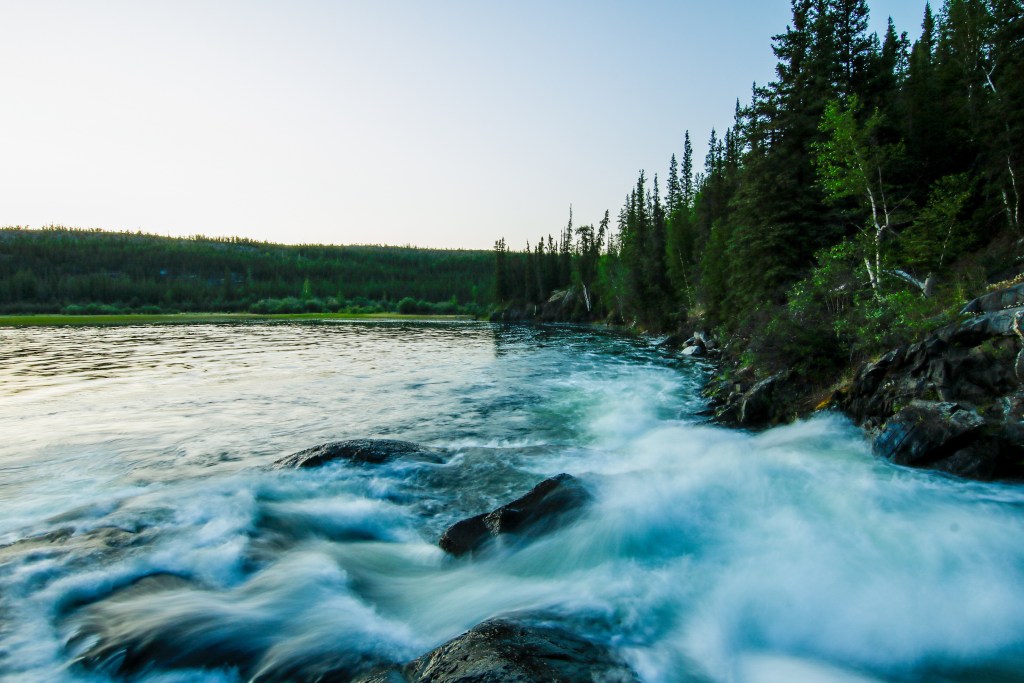
In this blog post, you will learn how exposure shapes the message an image portrays. For reference, the two waterfalls photos below will be referred to when speaking about the recommended camera settings. First, look at both pictures of the waterfalls. When looking at the images, closely look at and specifically compare the flow of the water.
If you want to challenge yourself, practise your photography knowledge with the following “Test your knowledge” section! Sometimes we need to challenge our minds by figuring out the answer before it’s given.

TEST YOUR KNOWLEDGE
Reading the answer is completely different from testing your knowledge with a mini exercise. If you want to understand what your current skill level as a beginner photographer, complete the questions below before reading the rest of this blog post.
Step 1: Examine both waterfalls photos
Step 2: Write down the difference you see. Pay close attention to the water flowing downstream.
Step 3: Write down which camera settings (ISO, aperture, exposure) you would primarily use to capture each image.
Step 4: Write down how you would achieve each photo with the specific camera settings you chose in step #3.
Step 5: Read the rest of the blog to see if you got the correct answer!
Comparing Photos
In the first image, the camera instantly captured the water flowing down. Looking at this first image, that is how I would remember the moment of viewing the ramparts in my memory. However, comparing the first image to the second photo, the story represented is entirely different. The imagery captures movement and power as the rushing stream forcibly merges with the lake before it. There is a true sense of motion and strength captured in this second image.
The variation captured between these two images is achieved by exposure settings. In the second photo of the rushing stream, the shutter speed was set to 0.7 seconds, which means it takes the camera seven seconds to take the picture. Choosing this setting causes the shutter to remain open for a more extended period, allowing the movement of the water to merge within the image to create this sense of movement and force. In the first waterfall image, a shutter speed of 1/50 was applied. As 1/50 is a considerably slow shutter speed, some sense of movement is captured, but not to the extent that we see occurring in the long exposure waterfall photo.
Photography Golden Rules
When experimenting with long exposure, there are a few golden rules that should be applied. The first two factors mentioned below are about camera stability. For a long exposure to properly work, the camera must remain stable.
Stability
First of all, a tripod is necessary. The better the quality of the tripod, the more stable your camera will be, therefore producing a quality photo. An inexpensive tripod can allow some camera movement, which, when combined with long exposures, will cause some blurriness. Aside from having a sturdy tripod, a lightweight tripod is also beneficial, especially if you will be travelling by foot long distances to capture your breathtaking images.
Secondly, you should apply for a delayed shutter release by at least 2 seconds. This way, when you take the photo, the camera will wait 2 seconds before snapping the picture. This allows the camera to stabilize after pressing the shutter release/push button to take a photo. An alternative is to use a remote for the shutter release or find an app on your phone that will be compatible with your camera.
Low-Light
Third, you will want a low-light setting. Because of the long exposure, more light is allowed into the camera to form the image. The Golden Hour, just following and before sunset and sunrise, provides even and less intense lighting necessary for beautiful photos. It also allows you to use a longer exposure without letting in too much light, as this will cause an over-exposed image.
Working with digital cameras is a great way to practice your skills. After all, you can experiment with various exposure settings because you can instantly see the results of your work. To capture the sense of movement you wish to portray, practice gaining the perfect balance between sufficient light and length of exposure to get your striking results.
Although the shutter speed is primarily used to change the length of exposure, you can manipulate the length of exposure through other settings.
Firstly, play with your ISO. The lower the ISO, the less light the camera uses to create its image. At any rate, for landscape photography, the lower the ISO, the better. I usually try to keep my ISO around 100. Second, you can play with the aperture, but I generally do not like this approach based on the image I am looking for. I usually try to keep my aperture between 11 to 16 to allow for a greater depth of field within the image for landscape. As well, photographers will often resort to filters to reduce their exposure time even further, which we can talk about in another blog post. Finally, processing can also play a role in extending your exposure time. At times, I slightly overexposed an image in the field to capture the sense of movement I am looking for in the water. Afterwards, in post-production, I will correct the exposure in Lightroom while still maintaining the impact of the exposure on the movement of the water captured in the image.
Before your next vacation, take a little time to become familiar with how exposure can impact the images. You can genuinely immerse your family and friends back home in the experiences you encounter through your pictures.
Stay Connected to Learn More
Are you a beginner photographer wanting to improve your skills?
Subscribe to our photography newsletter to be notified when we release our latest blog posts relating to photography content.