Photographing the northern lights can be tricky because this activity is weather dependent. Typically people will constantly check the weather forecast the evening of aurora viewing, hoping for a clear night sky. While a clear sky is an ideal situation for capturing this natural phenomenon, be careful about jumping to a decision too quickly. Canceling your night because the weather app predicts a cloudy evening shouldn’t be the only factor guiding your decision. Continue reading to learn how you can capture stunning photos of the northern lights, even with an overcast sky.

You might be wondering how you can still see the northern lights if the forecast says otherwise? As a lifetime northern, I can tell you that following the weather prediction could lead you from missing out on getting unique photos.
Being patient is the key to viewing the northern lights with an overcast sky.
Seeing the lights dancing in the night sky is an awestruck moment that is worth the wait. Being patient is truly the key because the weather is very unpredictable since the wind can change direction throughout the night. This is an important factor because if the winds change directions at any time during the evening, this movement can push the clouds, allowing the aurora to peek through.
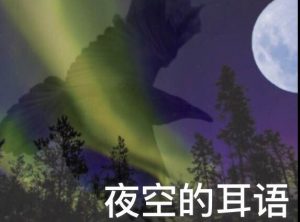
Originally it was a cloudy night when the photos above were taken, but the wind changed direction clearing the sky. This unique look of the clouds setting in between the northern lights captures the lights in an intriguing photograph. So even in cloudy weather, there is still a chance to see the most wonderful northern lights dancing through the night skies. It’s a rare spectacle that only happens on a cloudy night.

Camera Settings
The photos above were taken with a Canon T6I Rebel camera with an exposure of 30 seconds, and an ISO of 800 parameters. If you are planning to take photos of the northern lights, it is best to use a DLSR camera as you can control the settings to best capture the photo you want.
Long exposure is needed, which is why photographing with an iPhone won’t produce a great result because this option is limited to many phone cameras. If you are worried about the ability to take photos to cherish your trip, ask the tour operator you plan to go Aurora Viewing with because some companies offer photos as a complementary add-on, and others require you to purchase photos from your trip.

What type of camera you should have
This depends on the quality of photos you want. If you are simply looking to capture the memories from your trip, phones such as the IPhone 11 Pro can take decent photos. Technology has immensely improved over the recent years, so only the newer phones such as the IPhone 11 Pro can take relatively decent photos.
If you’re looking to take your photography more seriously, any DLSR camera using manual will take great quality photos of the northern lights. When you are working with a DLSR camera it comes down to knowing the basics about working in manual mode, and practice using your camera during the night. Popular cameras people use are DLSR cameras made by Canon, Nikon, and Sony using a wide angle lens to best capture the northern lights.